Last week's Feature Friday inspired me to bust out my package of polymer clay that I bought a couple years ago that I never used. We all know I love buttons, so I thought I would make some cute buttons out of the polymer clay to use as embellishments, for the centers of some Snappee's, to make more button magnets or simply just because I love buttons!
Disclaimer: I am no polymer clay artist...this tutorial comes out of basic trial and error! :)
Before we get started, be careful to use a surface that won't get damaged by the polymer clay. I chose to tape wax paper down on my table, so that I could just throw it away when I was done. You can also use aluminum foil. It's recommended that you don't use kitchen utensils as your polymer clay tools, but if you choose to do so just make sure to not use that utensil again for food!
Let's begin...
1. Tape down your wax paper and get out your polymer clay! I am using a Sculpey variety pack I picked up at WalMart.
2. Gather some items from around the house that can imprint your polymer clay to make different textures. For this tutorial, I used a bobby pin, pen cap, toothpick and a rubber stamp.
3. Break off a small chunk, and knead it until it's really soft.
4. Then start rolling it in between the palms of your hands or with one hand and a flat surface like the table until all the creases are smoothed out.
5. Start flattening the ball of clay out with your thumbs.
6. Flatten it until it's about an 1/8" thick, or however thick you will want your button.
7-8. Start using your items you found around the house to leave impressions on the clay.
9. I used the tip of a toothpick to make my own texture designs.
10. Using a button as a template, use the toothpick to leave marks where the button holes should be.
11. Use your knife (the purple one comes with the Sculpey variety pack) to cut out the button.
12. Peel the button out.
13. Turn your button over to make sure you poke the button holes through from the back, too.
14-15. Use rubber stamps to make different texture impressions.
16. You could leave your buttons like this, or make them with a ridge around the edge as you will see later.
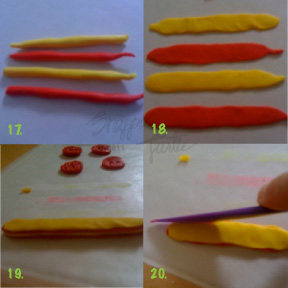
MAKING A POLYMER CLAY CANE
17. Take two balls of two different colors of polymer clay and roll each of them out to make 3" long rods. The thickness of your rods will determine how wide it will flatten, which determines the length of your cane. The length of your cane will determine how many buttons you will get out of the cane.
18. Flatten each of the rods until they are the width you desire (you will get one button for every 1/4" wide you flatten your clay). My clay is flattened to 1/2" wide, which will end up making two buttons.
19. Stack the flattened clay on top of one another, alternating colors. (Another way to get the same result would be to make one long rod of each color rather than two shorter rods of each color. Flatten and stack them on top of on another. When you roll the clay in step 21, it should achieve the same result.)
20. Trim the edges to make a rectangle with straight edges.
21. My rectangle is 3" in length and 1/2" wide. If you want to make a longer cane, your length should stay about 3" and it is your width that needs to be larger.
22. Start rolling your polymer clay rectangle tight from left to right to get the swirl look.
23. I used a piece of thin craft wire to slice my small cane in half so that it wouldn't flatten the top of my cane.
24. Lay your sliced piece of clay flat, and use the other end of the knife tool that comes with the Sculpey variety pack to make the button ridge around the edges (if you choose). Just press lightly, enough to make a smooth indention.
25. I used my toothpick to poke the holes in the button. Make sure to turn the button over to make sure the holes poked through the back and that the clay is flat.
26. I hate to waste anything, so I took the excess polymer clay that was trimmed off of the rectangle to make another button.
27. Roll it smoothly into another ball.
28. Flatten it out, and repeat steps 24-25.
Preheat your oven to 275 degrees and bake your buttons on a glass surface for 15 minutes. I used the outside of the bottom of a glass baking dish. Make sure the backs of the buttons are flat on the glass, so the polymer clay doesn't harden with a bend.
Let the buttons cool, and use your buttons on something fun like my "HI" card shown below!
Feel free to leave a comment with a link to your polymer clay buttons! I'd love to see them!
Thanks for stopping by,
Eva