Photobucket   Photobucket   Photobucket   Photobucket Photobucket Photobucket Photobucket   Photobucket
Showing posts with label Thrifty Thursday. Show all posts

Thursday, September 8, 2011

Thrifty Thursday • Cereal Box Repurpose

Things that need to be filed or shred is a constant annoyance to me.  I hate to do it, but if I don't do it consistently, we end up with a messy pile that is an eye sore.  I have a thrifty tutorial showing you what I did to go...


Supplies needed:


A cereal box (13" tall x 9.5" wide x 3" deep)
scissors
ruler
adhesive
pen
paper cutter
12 x 12 designer paper


First, let's cut our paper to cover the cereal box.

I want to hang my box on the side of the hutch, so I did not cover the back of the box or the inside part of the box front.

For the front:  10" x 9" (1 of these)  - if you want to cover the inside of the front of the box you can cut another, but cut it 9.5" x 9"

For the exterior sides:  12" x 3" (2 of these)

For the interior sides:  9" x 3" (2 of these)

For the inside back of the box:  12" x 9.5" (1 of these)

For the bottom of the box:  9.5" x 3" (1 of these)

Let's get started!
1-2.  Cut off the top flaps of the box as shown in the pictures below.
3.  On the front of the cereal box, measure 9" from the bottom of the box to the top.
4.  Draw a line across where we will want to cut off the excess at the top of the box.


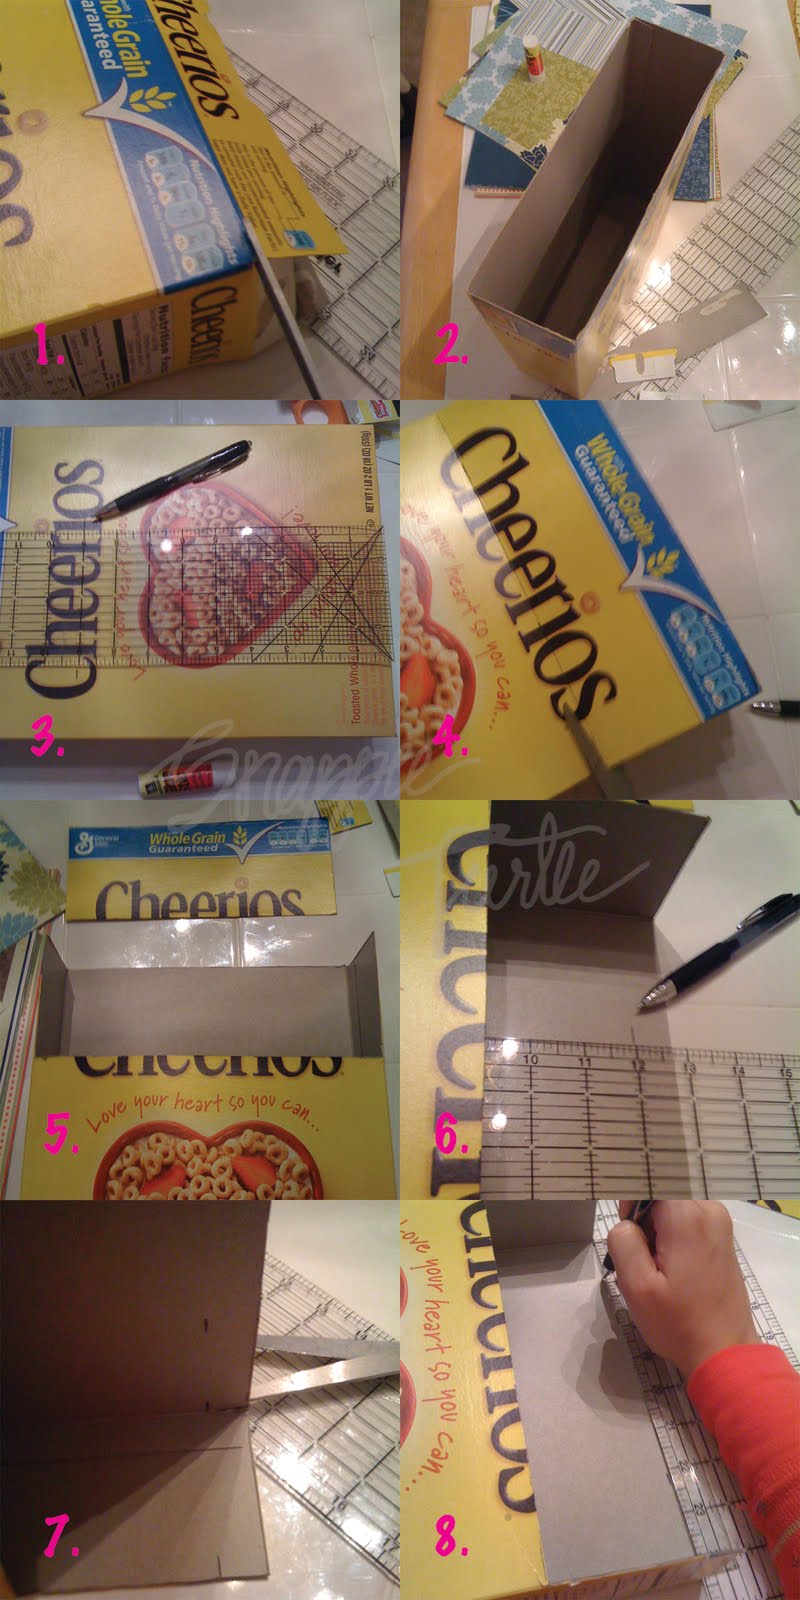
5.  Only cut the front part of the box out, not the sides.
6.  We now want to trim the rest of the box so that it is only 12" tall, so measure and mark 12" from the bottom of the cereal box to the top.
7-8.  It's easier if you cut the sides first, so you can draw your line with your ruler.

9.  Now cut down your line.
10.  Lay your box on it's side, and use your ruler to draw a line from the corner of the side and back of the box and the corner of the side and front of the box.
11-12.  Cut the triangle off to create the slanted box as shown below.


13.  Get ready to glue your designer paper!  I used some Stampin' Up designer paper that I purchased a few years ago.
14.  For the 9.5" x 10" rectangle for the front of the box, snip about a 1/4" square from each of the 4 corners.  The front of the box is actually 9.5" tall x 9" wide, but I wanted the paper to wrap around the edges for a more finished look.
15-16.  See how the paper wraps around to the side of the box.  I used a glue stick to glue it in place, and used my scissors to crease the paper in place.

17.  Now glue your 12" x 3" strips onto the exterior sides of the cereal box.  Fold the top of the paper down over the side of the box and glue onto the interior side of the box (it will make a triangle on the inside of the box).
18.  Glue your 12" x 9.5" sheet of paper onto the interior side of the back of the box.  Fold about 1/4" of the paper over the top of the cereal box and glue it in place on the back of the box.  This will leave a 1/4" gap uncovered at the bottom of the interior of the box, but you won't be able to see it since the box is so deep.


19.  Now take the two 9" x 3" strips and glue them into the interior sides of the cereal box under your folded over triangles.
20.  Glue your 3" x 9.5" strip onto the bottom of the box, and you are done!

I will most likely go back and embellish the front of the box some more, but for the sake of time and wanting to post the tutorial tonight...this is what I've got!

Hope you enjoyed!

Eva

Linking up with...


Sumo's Sweet StuffTip Junkie handmade projects


Candace Creations


Thursday, August 25, 2011

Thrifty Thursday • Star Themed Party

This last Saturday was Stella's first birthday party.  We didn't want to have a huge party and overwhelm her on her big day, but I still wanted to put time in to planning her special day.  I did most of the decorations myself, keeping it thrifty by using things I already had or borrowing some things.  Anything that I did purchase, I kept it at a minimum.

Choose the colors for your party based on a central object that will be in the room.  Since Stella was going to be the center of attention for the party, I based the colors of her party on her tutu.
Digital card created using Photoshop and My Digital Studio from Stampin' Up!

Tips to keeping it thrifty:

1.  Use your home or a room that you can get for free.  In our case, we reserved a room at the church where I work.  I even was able to borrow the white table linens for free.  I just have to wash them before I return them.

2.  Keep the menu to snacks and light refreshments.  Cut up your own veggies, fruit and cheese cubes.  Prepackaged trays are always way more expensive.  I wanted to make little star sandwiches, but again...time was not on my side (because I procrastinate!)  So if you really want to go all out with your star party, you could make turkey and cheese sandwiches or peanut butter and jelly (whatever you wish) and cut them out with a star cookie cutter.
Individual Photos by Mary Ann Slinn

3.  Make as many of the decorations as you can.
  • I had some of my own vases and borrowed the rest from a friend.  I used tissue paper I had saved from all of Stella's baby showers last year and turned them into pom-pom flowers, just like I did to make this star wreath.  I put them in the vases to add some color.  Even if you had to go out and buy tissue paper, you would only need to buy one pack of each color.  Most packs of tissue paper come with 10 sheets, and one sheet would make at least 4-8 pom-pom flowers to fit in the vases.  
  • I actually didn't make these hanging decorations, because I ran out of time.  For a pack of 3, it was only $7 at Party City.  You could make these, but you would need to use a whole pack of tissue paper just for one and follow the same directions to make the mini pom-pom flowers, just bigger.  All in all, I would have saved myself about $3, and I justified buying them because it would have taken me more time to make them than it was worth.
Photo by Corey Willoughby
  • I had 6 round tables in the room.  On each table there were 2 picture frames with a picture of Stella from one of the first 12 months of her life.  The frames were bought at the Dollar Tree for a buck a piece.  I ran out of time, but my plan was to make little table cards that stated which month the picture was from with a list of all her milestones she had met in that month
4.  Make your own cake to go along with the theme, and that acts as part of the decorations, too!  My grocery list:

FOR THE CAKE TIERS
$2.50 for 2 boxes of Betty Crocker Confetti cake mix
$1.80 for a carton of eggs
$3.20 for vegetable oil
$7.50

FOR THE BUTTERCREAM ICING
$ 1.25 for 1 bag of Domino's powdered can sugar
$ 5.00 Wilton's meringue powder
$ 4.00 Wilton's butter flavoring
$ 3.30 Vanilla Extract
$13.55

FOR THE MARSHMALLOW FONDANT
$  5.45 for Crisco shortening (I bought the larger tub for future use)
$  2.50 for 2-10.5oz bags of Kraft Jet Puffed mini marshmallows
$  5.25 for 4 each colors of Wilton's icing coloring
$  2.50 for 2 bags of Domino's powdered cane sugar
$15.70

If you have absolutely none of the above ingredients, your TOTAL COST would be:  $36.75
You could easily skip the fondant part and just color the butter cream icing, and your cake would only be $26.20 (you would still need to buy the food coloring, so I didn't subtract that amount).

Most of you will already have some of these items in your pantry, so you'll save even more than I did!  At least for the next cake you make, you will have the vanilla extract, butter flavoring, Wilton's icing coloring, Crisco shortening and meringue powder.  That in itself will save you $23 dollars!

For your next cake, it would only cost you $13.75 or $3.20 if you skip the fondant!!  You can't buy a cake for that cheap!


5.  I purchased a pack of 10 sunglasses in an assortment of colors for $2.00 at WalMart to give to the other kids as favors.  I got the sunglasses idea from my friend, Heather, who did the same thing for her son's first birthday.  Half of pack of sunglasses were shaped as stars and the other half were hearts.

Photo by Corey Willoughby
6.  Balloons.  A great way to add color to the room for a good price without having to buy too many.  I purchased balloons in 5 sets of 3.  One for the buffet/cake table, one for the At Party City it was 15 cents per helium filled balloon.  TIP:  Buy the balloons the day of the party.  Save yourself $10 or more from not having to buy the Hi-Float.  I was going to make my own balloon weights by wrapping up some glass marbles in tulle and tying it off, but Party City just happened to have star balloon weights in lime green and pink!  They were $2.50 a piece.

7.  Oh, yea!  Don't forget the matching plates, napkins and plastic ware!  I also had matching buckets to keep the ice water, as seen in the very first picture.

Well, that's all I have for ya!  Stars are so much fun, aren't they?   I hope you enjoyed our star themed party! 

Party on,

Eva  :)

Linking up with:


Thursday, August 18, 2011

Thrifty Thursday • Wire Hanger Star

I was searching the internet lately for some ideas for party decorations.  Surprisingly, Google was not my friend in finding star decorations.  We are having a small "Stella" party for her birthday, which means we are having a "star" party.  Most of the star themed party ideas I've come across are for rock star parties or movie star parties.  Not really what I am looking for.

We have a lot of extra wire hangers, and of course I have a whole bin full of gift bags and tissue paper from all the baby showers for Stella last year.  Remember, I keep things I think I will reuse!  So...I came up with the idea to make hanging star decorations out of the wire hangers and tissue paper.

Hanging on Stella's closet door (it matches her room for after the party)

I'll hang the stars from the ceiling for the party.

What you will need to make one star:


one wire hanger
8-10 sheets of tissue paper
about 40 inches of craft wire
hot glue
scissors
fishing wire or ribbon


First, let's make the wire hanger star:

1.  Start out with a wire hanger.  
2-3.  Use your thumb and fore finger to straighten the top bumps to form the top of the star, so that it looks like the picture in #3.
4.  Find the center point of the bottom of the wire hanger, and bend it inwards as shown in the picture below.  This will make the bottom indentation of the star.


5.  Start rounding out the two ends of the wire hanger.
6.  You will work the two pointed ends of the hanger to point inwards, making the ends of the wire hanger now the two side indentations of the star.
7.  Work with the wire to make the five points of the star as sharp as you can, so that it looks more like a star than a flower.  I guess, you could always leave it as a flower, too.  Just round out the top point of the star, so that it is like a petal.

Now your stars are ready to be dressed up!

I was inspired to use tissue paper to dress up my wire stars from this awesome blog post, where you can learn how to make the tissue paper pom-poms.
To get the same look for your star as mine, you will need the following sizes of tissue paper rectangles to make your pom-poms:

Star center (fuschia):  cut out 8 rectangles for each pom-pom flower (5" x 3.5")
Star legs and points (light pink & hot pink):  cut out 8 rectangles for each pom-pom flower (3.5" x 2.5")
To utilize the most out of your tissue paper, I folded my tissue paper sheet in half 5 times to get the 5" x 3.5" rectangles and 6 times to get the 3.5" x 2.5" rectangles.  Make sure to cut open the folds, so that you have individual loose rectangles.

*NOTE:  You want the pom-poms for the points and legs of the star to be smaller in size, so that you can tell it is a star and not a flower.  I made the center flowers larger to add some fullness to the star.

Now, for embellishing the wire hanger star:

1.  Stack your tissue paper rectangles for your pom pom.
2.  Fold them accordian style about 5 times.
3-4.  Wrap your craft wire around the center (you only need about 1 1/2" of craft wire per pom-pom, since these will turn out to be fairly small).  (I snipped the wire off of the bead bouquets that I use for the center of my Snappees that I found in the bridal section at Hobby Lobby)


5.  Round each end with a pair of scissors.  This will make your pom-poms look more like a flower.
6.  Fan out the accordian fold as shown in picture #6.
7-8.  Start separating the tissue paper layers from each other, fluffing it up to look like a flower (TIP:  be very gently when separating the tissue paper, so that you don't tear it apart)!


9.  Hot glue your tissue paper pom-poms onto your wire star, by placing the dab of glue on the center of the pom-pom where the wire is wrapped around.  
10.  Turn the star over, and wrap the tissue on the back side around the wire, pressing the tissue together to glue the whole pom-pom in place.
11.  Glue the bigger pom-poms on the 5 inverted points of the star first.  Then glue the rest of the smaller pom-poms on.
12.  Bend the hook of the hanger to make more of a circle for a nicer look.  
13.  Attach fishing wire to hang from the ceiling or some matching ribbon to hang it on the wall, and you're done!

I'd love to see your creations if you make one!  Feel free to post a link to a picture in the comment section if you do!

I think these would be cute to make around Christmas and New Year's with festive colors or red, white and blue for the 4th of July.  Hey!  Labor Day is coming soon!!

Thanks for joining us!

Eva

Linking up with...


Sumo's Sweet Stuff


Tip Junkie handmade projects


Candace Creations


Thursday, August 4, 2011

Thrifty Thursday • Baby Food Jars

So, I tend to never throw things away.  My hubby calls me a pack rat (not a hoarder).  I usually have to give him permission to just throw things away if it's still boxed up.  I obviously don't need it if I haven't unpacked it in over a year!  As long as I don't see something, I won't even remember I had it, right?

The thing is, I always save things with the thought that I will use it for this or that at some later date.  I've said before that I have lots of little ideas but lacked the time.  The bad thing is I let too much time go by, and things like boy scout popcorn tins, spaghetti sauce jars and empty tuna cans that I had planned to cover in pretty designer papers end up piled up in a garbage bag unused.  My hubby says if I haven't done anything with them in over a year then they need to be tossed or recycled.  I kept the popcorn tins, parted with the tuna cans.

Over the past few months I started saving Stella's baby food jars.  I thought they would be great for storing little things like safety pins and paper clips.  Of course, my hubby didn't know why I would need 20 little jars full of safety pins and paper clips (reasonable concern), so unless I would be giving my jars full of pins and clips to friends, they needed to be recycled.

But then I found a way to keep them without filling them with pins and clips.  They are perfect for storing buttons and sorting them by color!  I had enough buttons in such a variety of colors that I almost didn't have enough baby food jars!


Another way I have been using the smaller baby food jars are to store my ribbon rolls.  When left on the spool, ribbon tends to get loose.  I find it annoying always having to tighten it and either tape or pin it in place.  Plus, little miss someone likes to unravel the ribbon spools, too!


So I just started unraveling the ribbon and wrapping it around my finger, and once I had a tight roll I placed it right into the jar.  It keeps it all in place and pretty easy to pull out as much as I need at an given time and tuck it right back away.  Best fit for 1.5" x 4 yd ribbon spools.


I've also made a jar into a project take along.  I threw in some pieces of ribbon (or fabric), thread, buttons and a needle and had just what I needed to hand sew a Snappee flower on the go!


What other ways have you used or would you use a baby food jar?

Thanks for reading,

Eva

Linking up with: