Hey friends and fans!
Just wanted to wish you all a Happy Thanksgiving and thank all of you for your thoughts and prayers for our family. It's our first Thanksgiving without daddy. We are missing him a ton, but I know he is most definitely feasting in Heaven!
We have been overwhelmed by the love and support we have received from our friends and family! There is so much to be thankful for! Hope you all are counting your blessings, too!
As a way of saying thanks and getting back in the swing of things, I'd like to offer a Black Friday special to the FIRST FIVE FASIONISTAS who send me a private message on Facebook starting at 10:00am tomorrow.
The Black Friday deal will be 50% off a custom order (up to a $50 original priced order)! Once you message me, I will create a custom listing for you on Etsy to purchase!
Thanks again...and Happy Thanksgiving!
Much love,
Eva


Thursday, November 24, 2011
Friday, September 30, 2011
Going on a Hiatus
Hey friends and fans!
I just thought I'd write a quick note to let you know that Snappee Turtle will be on a hiatus for a bit. I had hoped to relaunch the blog in November, but it may be longer than that. I may do periodic posts to keep you in the loop, but don't expect anything consistent. Here's why:
My daddy (yes, I still call my dad "daddy" and I always will!) has been battling cancer for 5 years now. It's been quite the roller coaster, that's for sure! September 2006 we found out he had colon/rectal cancer. We thought it was surgically cut out and taken care of with radiation, but the cancer popped it's ugly head back up in a lymph node around that area. More surgery. Thought it was gone. Nope. Big C was back. This time in his liver and his lungs. At this point it was considered Stage 4 since it had spread to distant organs. 2 years of different kinds of chemo and the cancer was gone in his lungs and shrinking in his liver.
However, this past spring he was told his body was no longer responding to the chemo, and his doctor suggested trying some clinical trials. At the time, his insurance wasn't going to cover all the MRI's and scans he would need every week with these clinical trial. Instead, he found another cancer center that did a Y90 radiation treatment that his insurance did cover. He finished the treatment the end of July, and the doctor said "it worked."
The beginning of August he went into the ER because his abdomen was filling with fluid which was causing him a lot of pain. He needed to get the fluid drained by paracentesis (where they insert a needle into the abdomen to drain the fluid). During this visit, he was told that his cancer had now moved to his pelvic bone and was untreatable.
My family came down for Stella's birthday, and my daddy's leg/foot had become so swollen that he could barely walk. He had radiation treatment scheduled for the bone cancer to begin when they got back, which he did for 15 minutes a day for 10 days. This helped with the swelling in his leg, but only temporarily.
Just last Wednesday he went back into the ER because he woke up at 2:30 in the morning with shooting pains in his abdomen and shortness of breath. They did another paracentesis and found that his blood pressure was really low and he was dehydrated. They tried to surgically install a catheter drain so that he could drain the fluid himself into a catheter bag, rather than having to come to the hospital to have a paracentesis every time. However, when they made the incision, there was too many adhesions in that area and cancer that they couldn't find room to place the drain.
Instead, they inserted a JP drain, which at first wasn't working for 3 days, and then it all of a sudden started working. Thank the Lord, because it really relieves him from pain when the fluid does not build up so much!
His cancer doctor suggested that he go on hospice care (which you are only approved for hospice if your doctor recommends you because you are believed to only have 6 months or less to live). We worked it out with hospice that he can get blood transfusions if needed, as long as it doesn't turn into a weekly thing, but rather a monthly deal. When his hemoglobin is low, he feels really weak. Hospice is all about increasing your quality of living for the length of time a patient has left to live, so they agreed to this accommodation.
This is a really difficult time for our family. I was an emotional wreck last week. Couldn't sleep. Anxiety. I am so thankful for all of the prayers that have been lifted up for my daddy and our family during this time! My daddy has a lot of fight in him, and his trust in the Lord no matter what happens is amazing! We pray that he is one of those patients that surprises everyone by making it longer than 6 months!
The social worker from the hospital up north was extremely helpful. She helped us get hospice set up down here (2 hours south of where they live), and my oldest brother and parents moved into our house as soon as daddy was released from the hospital on Tuesday. So far, the hospice staff has been great! It's a tight squeeze in our house, but we rearranged enough to fit pretty comfortably.
Daddy needs a walker to get around, but he likes to get up and walk from feeling stiff and sore from sitting or laying all the time. He's feeling tired a lot. Not sure if its the methodone or the cancer. The nurse said it's just part of the journey.
So that's why Snappee Turtle is going on a hiatus. More important things right now. Trying to build as many memories as we can in the time that the Lord chooses to bless us with! Time I don't want to regret that I didn't spend with family! We played cards last night, and that was fun. My daddy wants to take Stella to the zoo next, so that's the first thing on our list! Just needing this cold, rainy weather to cooperate!
Thanks for understanding and for all of your prayers!
Much love,
Eva
Wednesday, September 14, 2011
WAWW • Going MIA
I haven't posted anything in a few days, but I sure have been brain storming a lot! I talked to a good friend of mine from college who is a pretty awesome photographer with a successful business. We brain stormed quite a bit over the phone about the Snappee Turtle product and how my blog relates. She gave me awesome feedback and quite a bit to chew on. I realized that what I'm doing with my blog doesn't exactly coincide with what my vision for Snappee Turtle is.
I often find myself back at the drawing board. I guess my constant rethinking and revamping comes with jumping in with both feet before having a fully thought out and prepared plan. But hey, I'd rather take the jump and learn and grow through experience! Otherwise, Snappee Turtle would just be another idea that I never did anything with.
In a nutshell, I'm planning on working on the Snappee Turtle brand/image, getting inventory made, my Etsy store up and going, and marketing my product lines. Sooo...I won't be posting anymore "Make it Mondays" or "Thrifty Thursdays," and I plan to introduce a new look and vision for the Snappee Turtle website/blog in the upcoming months.
And my friend that I mentioned earlier, she and I have a super fun photo shoot planned for November...so stay tuned! Thank you to all my readers so far. I hope you will enjoy what is coming soon!
Be blessed,
Eva
Thursday, September 8, 2011
Thrifty Thursday • Cereal Box Repurpose
Things that need to be filed or shred is a constant annoyance to me. I hate to do it, but if I don't do it consistently, we end up with a messy pile that is an eye sore. I have a thrifty tutorial showing you what I did to go...


A cereal box (13" tall x 9.5" wide x 3" deep)
scissors
ruler
adhesive
pen
paper cutter
12 x 12 designer paper
First, let's cut our paper to cover the cereal box.
I want to hang my box on the side of the hutch, so I did not cover the back of the box or the inside part of the box front.
For the front: 10" x 9" (1 of these) - if you want to cover the inside of the front of the box you can cut another, but cut it 9.5" x 9"
For the exterior sides: 12" x 3" (2 of these)
For the interior sides: 9" x 3" (2 of these)
For the inside back of the box: 12" x 9.5" (1 of these)
For the bottom of the box: 9.5" x 3" (1 of these)


Linking up with...


Supplies needed:

A cereal box (13" tall x 9.5" wide x 3" deep)
scissors
ruler
adhesive
pen
paper cutter
12 x 12 designer paper
First, let's cut our paper to cover the cereal box.
I want to hang my box on the side of the hutch, so I did not cover the back of the box or the inside part of the box front.
For the front: 10" x 9" (1 of these) - if you want to cover the inside of the front of the box you can cut another, but cut it 9.5" x 9"
For the exterior sides: 12" x 3" (2 of these)
For the interior sides: 9" x 3" (2 of these)
For the inside back of the box: 12" x 9.5" (1 of these)
For the bottom of the box: 9.5" x 3" (1 of these)
Let's get started!
1-2. Cut off the top flaps of the box as shown in the pictures below.
3. On the front of the cereal box, measure 9" from the bottom of the box to the top.
4. Draw a line across where we will want to cut off the excess at the top of the box.
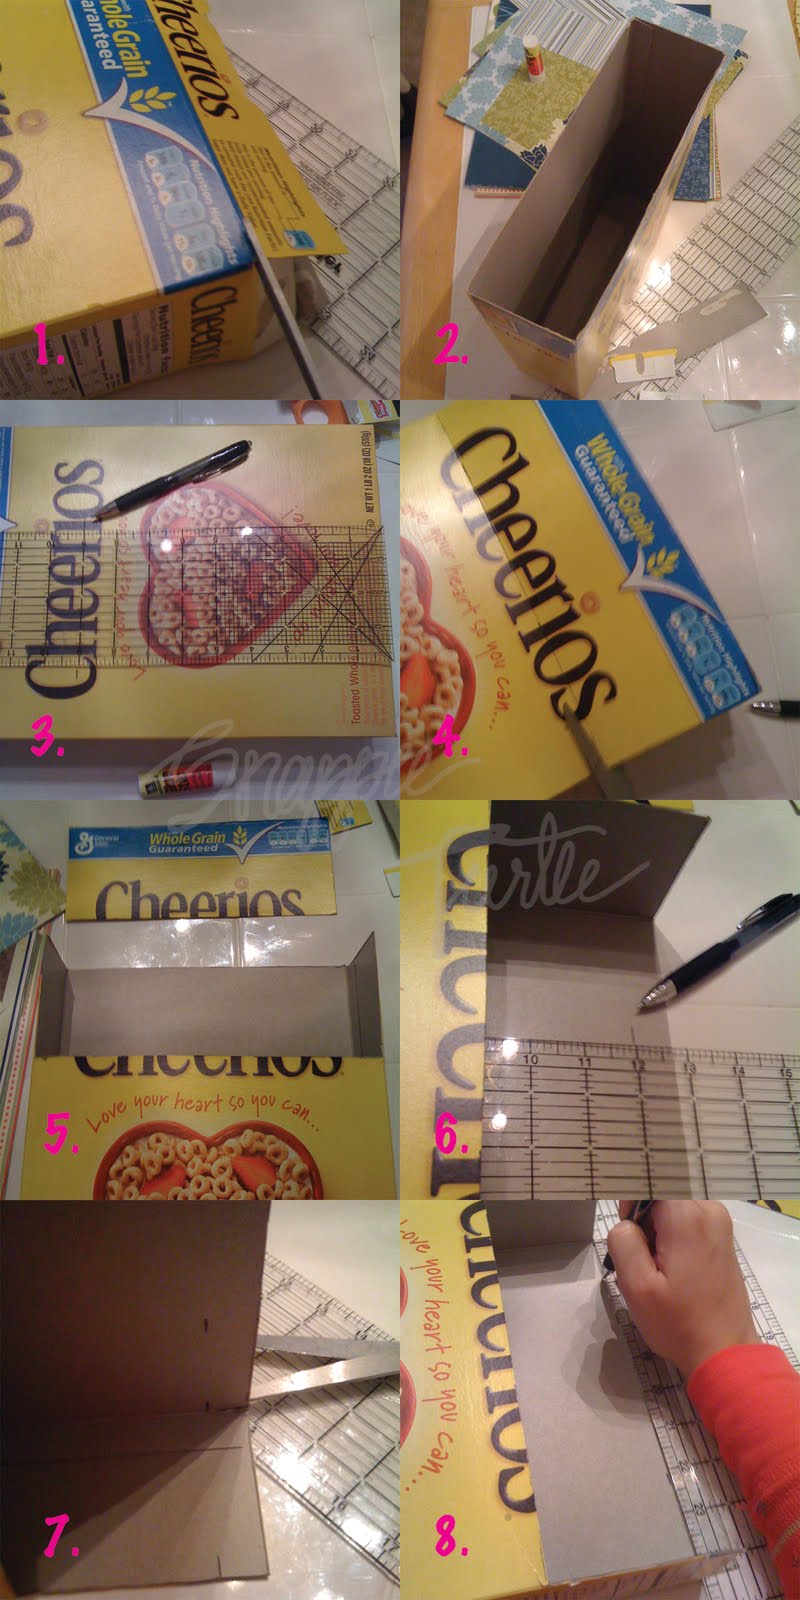
5. Only cut the front part of the box out, not the sides.
6. We now want to trim the rest of the box so that it is only 12" tall, so measure and mark 12" from the bottom of the cereal box to the top.
7-8. It's easier if you cut the sides first, so you can draw your line with your ruler.
9. Now cut down your line.
10. Lay your box on it's side, and use your ruler to draw a line from the corner of the side and back of the box and the corner of the side and front of the box.
11-12. Cut the triangle off to create the slanted box as shown below.

13. Get ready to glue your designer paper! I used some Stampin' Up designer paper that I purchased a few years ago.
14. For the 9.5" x 10" rectangle for the front of the box, snip about a 1/4" square from each of the 4 corners. The front of the box is actually 9.5" tall x 9" wide, but I wanted the paper to wrap around the edges for a more finished look.
15-16. See how the paper wraps around to the side of the box. I used a glue stick to glue it in place, and used my scissors to crease the paper in place.
17. Now glue your 12" x 3" strips onto the exterior sides of the cereal box. Fold the top of the paper down over the side of the box and glue onto the interior side of the box (it will make a triangle on the inside of the box).
18. Glue your 12" x 9.5" sheet of paper onto the interior side of the back of the box. Fold about 1/4" of the paper over the top of the cereal box and glue it in place on the back of the box. This will leave a 1/4" gap uncovered at the bottom of the interior of the box, but you won't be able to see it since the box is so deep.

19. Now take the two 9" x 3" strips and glue them into the interior sides of the cereal box under your folded over triangles.
20. Glue your 3" x 9.5" strip onto the bottom of the box, and you are done!
I will most likely go back and embellish the front of the box some more, but for the sake of time and wanting to post the tutorial tonight...this is what I've got!
Hope you enjoyed!
Eva
Wednesday, September 7, 2011
Win It Wednesday • And the Winner Is
AND THE WINNER IS...
 SO...this is really funny to me, and I PINKY PROMISE that this was the first draw and totally RANDOM! The reason it is funny is because Shelli and Leslie have been joking about how they were each going to beat each other in the giveaway, probably assuming that neither of them would actually win.
Here is how Rafflecopter works...as each participant clicks "I DID THIS" when entering through the Rafflecopter form, the entry information is imported into a spreadsheet and assigned a number based on how many entries each category was worth. For example, "Tag Snappee Turtle in a Facebook Post" was worth 2 entries and could be counted once per day. "Like Snappee Turtle on Facebook" was worth 1 entry and could only be counted once for the whole contest. However, Rafflecopter will allow a participant to click on the "I DID THIS" button for liking the Facebook page each time you come back to the giveaway page, so it is up to the moderator (me in this case) to manually delete entries that were not supposed to be counted twice.
After I moderated the entries, there were 45 total entries. I clicked on "ADD A WINNER" and the winning entry was generated through random. org and came up with entry #19...Shelli Morrison. Shelli already has "The Stella" so I added another winner to see who the next winner would be and the random number was #29...Leslie Russell! Too funny!
Thanks to all of you who participated! Stay tuned...there will be another Snappee Turtle giveaway later this month!! HINT: NFL
Warm wishes,
Eva
Tuesday, September 6, 2011
Turtle Tuesday • Last Chance to Enter
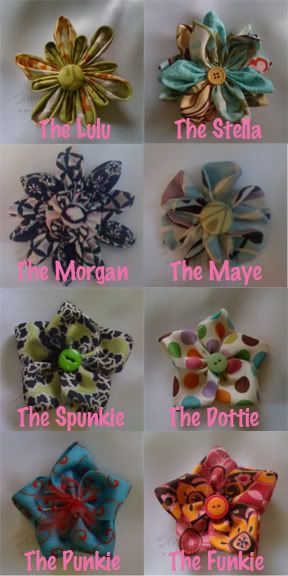
Today is the last chance to enter the giveaway! Tomorrow I will draw a number at random using the random number generator from random.org. The votes are in, and one lucky winner will win "The Stella" flower Snappee, a 5 petal satin flower Snappee in the winner's choice of color, and the winner's choice of either one cream satin covered, interchangeable headband or two elastic interchangeable headbands in two different coordinating colors.
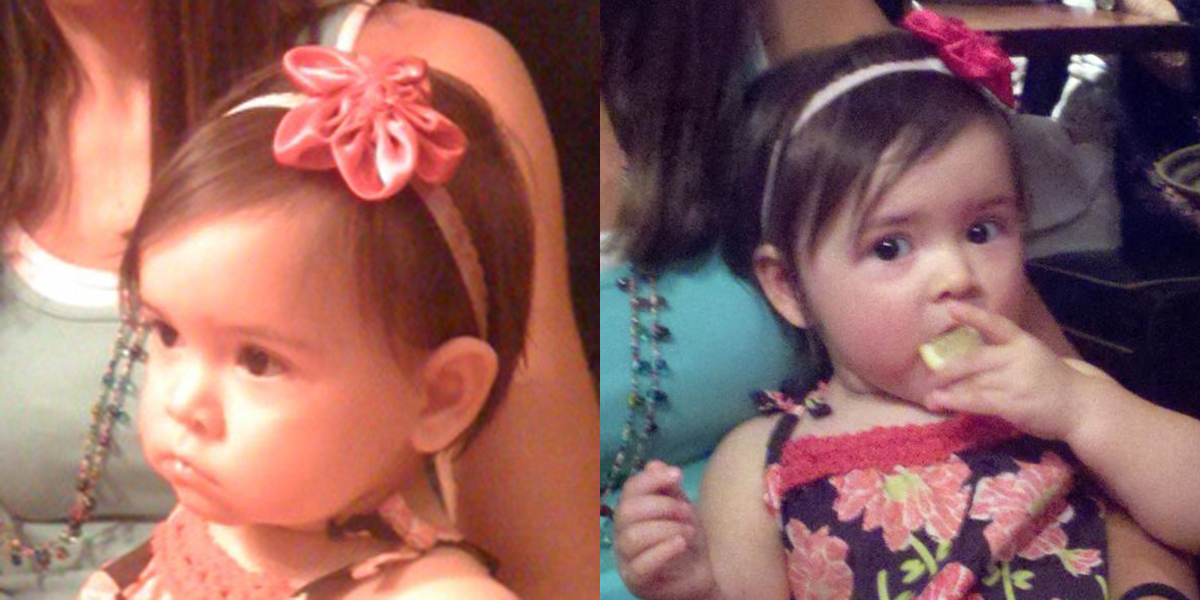
This weekend we traveled up to Naperville, IL for Labor Day weekend to hang out with some dear friends who recently moved away. One of the Snappees my friend ordered for her daughter, Morgan, was "The Stella," so she got to model it for me! This is Morgan, sporting "The Stella" flower Snappee with a white 1/4" elastic band. Doesn't she look super cute?!


The first night we went out for deep dish pizza in downtown Naperville at Lou Malnatti's. Stella debuted one of my finished 5 petal satin flower Snappees in magenta. Stella was loving that lemon! She didn't cry until I tried to take it away from her! Silly girl! I guess she gets it from her mama, because I actually love lemons!

Here are a bunch of the colors of elastic I just received in the mail today! The lucky winner will get to choose between 1/8" or 1/4" elastic. The 1/8" comes in 26 different colors, and the 1/4" comes in 17 different colors. Yummo!!

You still have an hour to get an entry in! Enter now, so you don't miss out! Just make sure you click on the "I DID THIS" button for your entry to be counted in the giveaway!

Looking forward to seeing who wins! Thanks for participating!!
~Eva & Miss Turtle :)
This weekend we traveled up to Naperville, IL for Labor Day weekend to hang out with some dear friends who recently moved away. One of the Snappees my friend ordered for her daughter, Morgan, was "The Stella," so she got to model it for me! This is Morgan, sporting "The Stella" flower Snappee with a white 1/4" elastic band. Doesn't she look super cute?!


The first night we went out for deep dish pizza in downtown Naperville at Lou Malnatti's. Stella debuted one of my finished 5 petal satin flower Snappees in magenta. Stella was loving that lemon! She didn't cry until I tried to take it away from her! Silly girl! I guess she gets it from her mama, because I actually love lemons!
Here are a bunch of the colors of elastic I just received in the mail today! The lucky winner will get to choose between 1/8" or 1/4" elastic. The 1/8" comes in 26 different colors, and the 1/4" comes in 17 different colors. Yummo!!

You still have an hour to get an entry in! Enter now, so you don't miss out! Just make sure you click on the "I DID THIS" button for your entry to be counted in the giveaway!

Looking forward to seeing who wins! Thanks for participating!!
~Eva & Miss Turtle :)
Friday, September 2, 2011
Fab Idea Friday • Versatile Blogger Award
To my surprise, I received an email notification that Melanie from Bear Rabbit Bear had left me a comment on one of my blog posts. She said that she had nominated my blog for the Versatile Blogger Award. Cool! I have only been blogging a little over a month now, so it's been fun to have been nominated!
I had no idea what this award was, so I started searching the internet to see if there was an official site or something. All I could find were numerous blog posts about other bloggers who were also nominated for the Versatile Blogger Award by someone else.

I wondered if it was like some sort of chain letter, which I would usually disregard...but I think this is a great concept! It's such a fun idea to build blogger camaraderie. A way to share the love, pay it forward and promote one another, so to speak. Besides, there is so much crafty goodness out in blog land, so why not share some more with you all! So here is how it works...
Rules to accept the award:
1. Thank the person who gave it to you and link back to them in your post.
2. Share 7 things about yourself.
3. Nominate 15 blogs you have recently discovered.
I thanked Melanie right away the other day, but I am just now finally getting to post this and share the love.
Seven Things about Me
So here is my list of 15 recently discovered versatile blogs:
The list is in order of blogs I have most recently discovered beginning with the newest blogs first. They are all great craft blogs that I have come across through linky parties or Pinterest, but the last one is a friend's craft blog that I've bee following a while ;)
On another note, while I was over at Bear Rabbit Bear, I noticed that she included my "Star Themed Party" in her collection of party ideas. Check out her blog, because she has a bunch of different party theme ideas among other crafty fun tutorials for kids and teens!
Hope you all have a Fab Friday!
Eva
I had no idea what this award was, so I started searching the internet to see if there was an official site or something. All I could find were numerous blog posts about other bloggers who were also nominated for the Versatile Blogger Award by someone else.

I wondered if it was like some sort of chain letter, which I would usually disregard...but I think this is a great concept! It's such a fun idea to build blogger camaraderie. A way to share the love, pay it forward and promote one another, so to speak. Besides, there is so much crafty goodness out in blog land, so why not share some more with you all! So here is how it works...
Rules to accept the award:
1. Thank the person who gave it to you and link back to them in your post.
2. Share 7 things about yourself.
3. Nominate 15 blogs you have recently discovered.
I thanked Melanie right away the other day, but I am just now finally getting to post this and share the love.
Seven Things about Me
- I love Jesus! Words can't even describe.
- I adore my husband and sweet little daughter, my family & my friends...and our 3 furry friends.
- I love coffee....with flavored creamer. I used to put in an additional 4-8 packets of sugar (which is why my dad calls them liquid candy bars) until I had gestational diabetes with my pregnancy and converted to Splenda. Now I just do the flavored creamer, no sugar or Splenda.
- I also love Cherry Coke, but it has to be the Coca Cola Cherry Coke...none of that grenadine stuff or any other Cherry flavored pop. (Yes, I call it pop...not soda...and I only call a Coke a coke. I don't consider Mountain Dew a coke). -That's for all my "southern" friends. I'm originally from "the Region," the northwest corner of Indiana, and apparently we say things weird.
- I can only draw if I look at something and can pretty much draw it exactly how it looks. For example, if I just try to think of something (like an elephant) in my head, it would not turn out nearly as good as if I was looking at an elephant.
- My husband and I love to do jigsaw puzzles (we've been collecting the Tooniverse puzzles by Steve Skelton for about 5 years now). It's usually a winter month kinda thing we do. We do play Euchre with friends about once a week pretty consistently.
- I love to play sports...soccer, basketball, volleyball, softball, ping pong, you name it! Fastpitch softball was my love, but I've come to love coed slow pitch because it's been my only option...I still slap hit, even in slow pitch...ha! Itching to play this spring, since our team has taken a 2 year sabbatical since almost all the women on the team started having babies!
Before I chose my 15 blogs to nominate, I looked up Merriam-Webster's definition of "versatile." It says:
Definition of VERSATILE
1
: changing or fluctuating readily : variable <a versatiledisposition>
2
: embracing a variety of subjects, fields, or skills; also :turning with ease from one thing to another
3
a (1) : capable of turning forward or backward : reversible<a versatile toe of a bird> (2) : capable of moving laterally and up and down <versatile antennae>b of an anther : having the filaments attached at or near the middle so as to swing freely
4
: having many uses or applications <versatile building material>
So here is my list of 15 recently discovered versatile blogs:
The list is in order of blogs I have most recently discovered beginning with the newest blogs first. They are all great craft blogs that I have come across through linky parties or Pinterest, but the last one is a friend's craft blog that I've bee following a while ;)
- Live.Laugh.Rowe
- Yellow Me Daisy
- Blue Velvet Chair
- Rhinestone Beagle
- The Jaderbomb Blog
- Lil Pink Pocket
- A Content Housewife
- Seasons with the Sewells
- Funky Faith Girl
- Candace Creations
- La-Dee-Da Creations
- Hungry Happenings
- The Ivy Cottage
- Thrifty Decorating
- Amy Cornwell Designs
On another note, while I was over at Bear Rabbit Bear, I noticed that she included my "Star Themed Party" in her collection of party ideas. Check out her blog, because she has a bunch of different party theme ideas among other crafty fun tutorials for kids and teens!
Hope you all have a Fab Friday!
Eva
Thursday, September 1, 2011
Enter the Snappee Turtle Grand Opening Giveaway
There's been some slight changes to the giveaway rules that were announced yesterday. All entries must be entered through the Rafflecopter widget which can be found at the end of this post or at the Snappee Turtle Facebook fan page.
Voting for the winning flower Snappee is still being extended through Labor Day Weekend. Be sure to check out this post and then head over to the Snappee Turtle facebook page to vote for your favorite!
Along with the flower Snappee that receives the most votes, I will be giving away a coordinating 5 petal satin flower Snappee and a either a magnetically interchangeable satin covered headband or two magnetically interchangeable coordinating elastic headbands that are coming soon!
The Grand Opening Giveaway winner will be announced during next week's "Win It Wednesday" blog post!
DIRECTIONS
First click on the "DO IT: Click Here" or "DO IT: Click for Instructions" hyperlink. Once you've completed the task, click on the "I DID THIS" button to complete the entry.
REQUIRED TO ENTER (worth 1 entry)
1. LIKE Snappee Turtle on Facebook
NO LONGER REQUIRED (but worth 5 entries)
Leave a comment in the comment section of this post (you don't have to have a blogger account to comment) with the following:- where you heard about the giveaway by stating "Coming over from..."
- who the headband and flower Snappees would be for if you won the giveaway (if not for you, the age of the person who will receive the giveaway items)
- your name
Your comment may look like this:
"New fan coming over from (insert friend's name here)'s Twitter tweet. If I won the giveaway, I would give it to my daughter who is one. ~Eva Taylor"
or
"Existing fan coming over from the Snappee Turtle facebook post. If I won the giveaway, I would keep it for myself. ~Eva Taylor"
WAYS TO GET ENTRIES INTO THE GIVEAWAY (all worth 1 entry a piece):
WAYS TO GET ENTRIES INTO THE GIVEAWAY (all worth 1 entry a piece):
- FOLLOW this blog on Blogger (see the widget in the left sidebar)
- FOLLOW this blog on Networked Blogs (see the widget in the left side bar)
- FOLLOW Snappee Turtle on Twitter
GET MORE ENTRIES DAILY:
- Tag @Snappee Turtle in a Facebook post, and mention the giveaway. (counts as 2 entries; you can do this once a day).
- Mention #SnappeeTurtle and this giveaway in a tweet. (counts as 2 entries; you can do this once a day).
- For each new comment who says "coming over from (your name)'s Facebook post/share link, Twitter mention or blog" will count for 5 entries per referral. You can only submit this entry once a day. However, if the referrals all happen to be on the same day, you can submit each of them separately on different days. You must check the comments section to see if any of your friends mentioned you as a referral and type their name in the "additional info" section of the entry...or make sure your friends let you know when they have mentioned you as a referral so you know to enter for that category.
HOW THE WINNER IS DETERMINED
The Rafflecopter widget automatically assigns numbers to each entry. A random number generator from random.org will be used to come up with the winning number. The winner will be announced on Wednesday, September 7, 2011.
READY, SET, ENTER!!!
The Giveaway Prize:
Wednesday, August 31, 2011
WAWW • Package Delivered
It's a "What About Wednesday? Wednesday" kind of day!! I am so super excited because my custom order magnetic snaps came in today! Wahoo!!

It felt like I was opening a long awaited Christmas present, and I am super happy with the way they turned out!

I would really like a new camera! I'm sure you can at least tell it says "Snappee Turtle." They look much better, so I guess you'll just have to place an order and see the real thing! ;) Don't forget to enter the giveaway and you might just win yourself a pretty cool set!
Now that I finally have my snaps, all I need is some quality craft time to get orders assembled! I'll finally be listing fun stuff on Etsy in the coming weeks for the first time, as well! Did I say that I am excited?!
Thanks for sharing in my excitement ;)
Eva
Tuesday, August 30, 2011
Turtle Tuesday • Grand Opening Giveaway Rules
Please see the newest post with the official rules of entry. Do NOT comment on this post for the giveaway.
It looks like "The Stella"is in the lead for the flower Snappee of choice to be given away for the Snappee Turtle Grand Opening Giveaway! However, I am going to extend the voting through the Labor Day weekend, so be sure to check out this post and then head over to the Snappee Turtle facebook page to vote for your favorite!
Along with the flower Snappee that receives the most votes, I will be giving away a coordinating 5 petal satin flower Snappee and a either a magnetically interchangeable satin covered headband or two magnetically interchangeable coordinating elastic headbands that are coming soon!
The Grand Opening Giveaway winner will be announced during next week's "Win It Wednesday" blog post!
WAYS TO GET ENTRIES INTO THE GIVEAWAY:
1. LIKE Snappee Turtle on Facebook
2. FOLLOW this blog on Blogger (see the widget in the left sidebar)
3. FOLLOW this blog on Networked Blogs (see the widget in the left side bar)
4. FOLLOW Snappee Turtle on Twitter
REQUIRED TO ENTER
Once you've done one or all of the options above, leave a comment in the comment section of this post (you don't have to have a blogger account to comment) with the following:
- where you heard about the giveaway by stating "Coming over from..."
- state whether you are a "new" or "existing" Facebook/Blogger/NetworkedBlog/Twitter fan. (For those who are already a fan/follower of any of the above, you will not be entered in the giveaway if you do not leave a comment, that way I know who is actually participating).
- who the headband and flower Snappees would be for if you won the giveaway (if not for you, the age of the person who will receive the giveaway items)
- your name
Your comment may look like this:
"I'm a new Facebook/Blogger/NetworkedBlog/Twitter follower coming over from (insert friend's name here)'s Twitter tweet. If I won the giveaway, I would give it to my daughter who is one. ~Eva Taylor"or
"I'm an existing Facebook & Twitter follower, new Blogger & Networked Blog follower, coming over from the Snappee Turtle facebook post. If I won the giveaway, I would keep it for myself. ~Eva Taylor"
Other ways to get more entries:
1. Tag @Snappee Turtle in a Facebook post, and mention the giveaway.
2. Mention #SnappeeTurtle and this giveaway in a tweet.
3. For each new entry who says "coming over from (your name)'s Facebook post/share link, Twitter mention or blog" will give you an additional entry.
Please mention in your comment that you tagged or mentioned Snappee Turtle, so I know to look for it!
HOW THE WINNER IS DETERMINED
A random number generator will be used to come up with the winning number. Who that winning number is will be decided by assigning a range of numbers to each comment, depending on how many qualifying entries that person who commented had. Numbers will be assigned starting with the first comment.
For example:
The random winning number is 11.
The first comment was from Suzie Sewsalot who is a follower on Facebook, Blogger & Networked Blogs (3 entries). She also tagged @Snappee Turtle on Facebook (1 entry) and 2 other commenters said they were coming over from Suzie Sewsalot's Facebook post (2 entries). Suzie would have a total of 6 entries, so she would be assigned numbers 1-6.
The second commenter was from Nora Needles who is a new Facebook fan (1 entry). Nora would have a total of 1 entry, so she would be assigned just the number 7.
The next commenter was from Betsy Bobbin who is a follower on Blogger and Twitter (2 entries). She also mentioned #SnappeeTurtle on Twitter (1 entry) and one other commenter said she was coming over from Betsy Bobbin's tweet on Twitter (1 entry). Betsey would have a total of 4 entries, so she would be assigned numbers 8-11.
Besty Bobbin would be the winner with the random winning number of 11!
READY, SET, GO!!!
I hope this makes sense, and I look forward to seeing who wins!
Best regards,
Eva
Monday, August 29, 2011
Make It Monday • DIY Wreath Ideas
Scouring the blogosphere, I came across some really neat wreath ideas. I shared with you a couple weeks ago how to make the tissue paper star wreath out of a wire hanger, which was my original idea. However, the ones I am going to share with you are someone else's idea that I'd like to make myself sometime. I thought I would share them with you! You can click on the links provided for the full tutorials.
Paper Umbrella Wreath
![]()
Cupcake Liner Wreath
![]()
Men's Tie Wreath
![]()
Felted Ball Wreath
![]()
PVC Pipe Wreath
![]()
Magazine Pages Wreath
![]()
Balloon Wreath
![]()
Button Wreath Ornament
![]()
Aren't these fun?! I want to make a few of them, for sure! If any of you make one or come across any other cool wreath ideas feel free to share a link in the comments!!
Warm wishes,
Eva
Paper Umbrella Wreath
Cupcake Liner Wreath
Men's Tie Wreath
Felted Ball Wreath
PVC Pipe Wreath
Magazine Pages Wreath
Balloon Wreath
Button Wreath Ornament
Aren't these fun?! I want to make a few of them, for sure! If any of you make one or come across any other cool wreath ideas feel free to share a link in the comments!!
Warm wishes,
Eva
Friday, August 26, 2011
Fab Idea Friday • Vote for the Giveaway
My custom magnetic snaps are on their way, and I will finally have them in my hands next week!!! I am so excited to finish assembling my pre-orders and get them out to all my fans!
I am so super excited! So excited, that I will be hosting an official Snappee Turtle Grand Opening Giveaway!

I will be giving away one fabric covered interchangeable headband of the winner's choice along with two interchangeable flower Snappee's (up to a $37 dollar value + free shipping). One of the Snappee's will be the winner's choice of one of the five petal satin flowers, and I need your help choosing what other flower Snappee to give away.
Which Snappee would you like to receive if you won the giveaway? Head on over to the Snappee Turtle Facebook Fan Page and vote for your favorite Snappee flower in the poll! The Snappee flower with the most votes will be the one given away!
The official rules of the giveaway will be announced on Tuesday, August 30th, but you can get a head start by liking the Snappee Turtle Facebook Fan Page, because that will be a requirement to enter. There will also be other ways to submit multiple entries, so stay tuned. While you are at our Facebook page, don't forget to vote for your favorite flower Snappee!!
I hope you'll join us for our first giveaway!
Warm wishes,
Eva
I am so super excited! So excited, that I will be hosting an official Snappee Turtle Grand Opening Giveaway!
I will be giving away one fabric covered interchangeable headband of the winner's choice along with two interchangeable flower Snappee's (up to a $37 dollar value + free shipping). One of the Snappee's will be the winner's choice of one of the five petal satin flowers, and I need your help choosing what other flower Snappee to give away.
Which Snappee would you like to receive if you won the giveaway? Head on over to the Snappee Turtle Facebook Fan Page and vote for your favorite Snappee flower in the poll! The Snappee flower with the most votes will be the one given away!
The official rules of the giveaway will be announced on Tuesday, August 30th, but you can get a head start by liking the Snappee Turtle Facebook Fan Page, because that will be a requirement to enter. There will also be other ways to submit multiple entries, so stay tuned. While you are at our Facebook page, don't forget to vote for your favorite flower Snappee!!
I hope you'll join us for our first giveaway!
Warm wishes,
Eva
Thursday, August 25, 2011
Thrifty Thursday • Star Themed Party
This last Saturday was Stella's first birthday party. We didn't want to have a huge party and overwhelm her on her big day, but I still wanted to put time in to planning her special day. I did most of the decorations myself, keeping it thrifty by using things I already had or borrowing some things. Anything that I did purchase, I kept it at a minimum.
Choose the colors for your party based on a central object that will be in the room. Since Stella was going to be the center of attention for the party, I based the colors of her party on her tutu.
Tips to keeping it thrifty:
1. Use your home or a room that you can get for free. In our case, we reserved a room at the church where I work. I even was able to borrow the white table linens for free. I just have to wash them before I return them.
2. Keep the menu to snacks and light refreshments. Cut up your own veggies, fruit and cheese cubes. Prepackaged trays are always way more expensive. I wanted to make little star sandwiches, but again...time was not on my side (because I procrastinate!) So if you really want to go all out with your star party, you could make turkey and cheese sandwiches or peanut butter and jelly (whatever you wish) and cut them out with a star cookie cutter.
3. Make as many of the decorations as you can.
FOR THE CAKE TIERS
$2.50 for 2 boxes of Betty Crocker Confetti cake mix
$1.80 for a carton of eggs
$3.20 for vegetable oil
$7.50
FOR THE BUTTERCREAM ICING
$ 1.25 for 1 bag of Domino's powdered can sugar
$ 5.00 Wilton's meringue powder
$ 4.00 Wilton's butter flavoring
$ 3.30 Vanilla Extract
$13.55
FOR THE MARSHMALLOW FONDANT
$ 5.45 for Crisco shortening (I bought the larger tub for future use)
$ 2.50 for 2-10.5oz bags of Kraft Jet Puffed mini marshmallows
$ 5.25 for 4 each colors of Wilton's icing coloring
$ 2.50 for 2 bags of Domino's powdered cane sugar
$15.70
If you have absolutely none of the above ingredients, your TOTAL COST would be: $36.75
You could easily skip the fondant part and just color the butter cream icing, and your cake would only be $26.20 (you would still need to buy the food coloring, so I didn't subtract that amount).
Most of you will already have some of these items in your pantry, so you'll save even more than I did! At least for the next cake you make, you will have the vanilla extract, butter flavoring, Wilton's icing coloring, Crisco shortening and meringue powder. That in itself will save you $23 dollars!
For your next cake, it would only cost you $13.75 or $3.20 if you skip the fondant!! You can't buy a cake for that cheap!
 5. I purchased a pack of 10 sunglasses in an assortment of colors for $2.00 at WalMart to give to the other kids as favors. I got the sunglasses idea from my friend, Heather, who did the same thing for her son's first birthday. Half of pack of sunglasses were shaped as stars and the other half were hearts.
6. Balloons. A great way to add color to the room for a good price without having to buy too many. I purchased balloons in 5 sets of 3. One for the buffet/cake table, one for the At Party City it was 15 cents per helium filled balloon. TIP: Buy the balloons the day of the party. Save yourself $10 or more from not having to buy the Hi-Float. I was going to make my own balloon weights by wrapping up some glass marbles in tulle and tying it off, but Party City just happened to have star balloon weights in lime green and pink! They were $2.50 a piece.
7. Oh, yea! Don't forget the matching plates, napkins and plastic ware! I also had matching buckets to keep the ice water, as seen in the very first picture.
Well, that's all I have for ya! Stars are so much fun, aren't they? I hope you enjoyed our star themed party!
Party on,
Eva :)
Choose the colors for your party based on a central object that will be in the room. Since Stella was going to be the center of attention for the party, I based the colors of her party on her tutu.
 | ||||
| Digital card created using Photoshop and My Digital Studio from Stampin' Up! |
Tips to keeping it thrifty:
1. Use your home or a room that you can get for free. In our case, we reserved a room at the church where I work. I even was able to borrow the white table linens for free. I just have to wash them before I return them.
2. Keep the menu to snacks and light refreshments. Cut up your own veggies, fruit and cheese cubes. Prepackaged trays are always way more expensive. I wanted to make little star sandwiches, but again...time was not on my side (because I procrastinate!) So if you really want to go all out with your star party, you could make turkey and cheese sandwiches or peanut butter and jelly (whatever you wish) and cut them out with a star cookie cutter.
 |
| Individual Photos by Mary Ann Slinn |
3. Make as many of the decorations as you can.
- I had some of my own vases and borrowed the rest from a friend. I used tissue paper I had saved from all of Stella's baby showers last year and turned them into pom-pom flowers, just like I did to make this star wreath. I put them in the vases to add some color. Even if you had to go out and buy tissue paper, you would only need to buy one pack of each color. Most packs of tissue paper come with 10 sheets, and one sheet would make at least 4-8 pom-pom flowers to fit in the vases.

- I actually didn't make these hanging decorations, because I ran out of time. For a pack of 3, it was only $7 at Party City. You could make these, but you would need to use a whole pack of tissue paper just for one and follow the same directions to make the mini pom-pom flowers, just bigger. All in all, I would have saved myself about $3, and I justified buying them because it would have taken me more time to make them than it was worth.

 |
| Photo by Corey Willoughby |
- I had 6 round tables in the room. On each table there were 2 picture frames with a picture of Stella from one of the first 12 months of her life. The frames were bought at the Dollar Tree for a buck a piece. I ran out of time, but my plan was to make little table cards that stated which month the picture was from with a list of all her milestones she had met in that month
FOR THE CAKE TIERS
$2.50 for 2 boxes of Betty Crocker Confetti cake mix
$1.80 for a carton of eggs
$3.20 for vegetable oil
$7.50
FOR THE BUTTERCREAM ICING
$ 1.25 for 1 bag of Domino's powdered can sugar
$ 5.00 Wilton's meringue powder
$ 4.00 Wilton's butter flavoring
$ 3.30 Vanilla Extract
$13.55
FOR THE MARSHMALLOW FONDANT
$ 5.45 for Crisco shortening (I bought the larger tub for future use)
$ 2.50 for 2-10.5oz bags of Kraft Jet Puffed mini marshmallows
$ 5.25 for 4 each colors of Wilton's icing coloring
$ 2.50 for 2 bags of Domino's powdered cane sugar
$15.70
If you have absolutely none of the above ingredients, your TOTAL COST would be: $36.75
You could easily skip the fondant part and just color the butter cream icing, and your cake would only be $26.20 (you would still need to buy the food coloring, so I didn't subtract that amount).
Most of you will already have some of these items in your pantry, so you'll save even more than I did! At least for the next cake you make, you will have the vanilla extract, butter flavoring, Wilton's icing coloring, Crisco shortening and meringue powder. That in itself will save you $23 dollars!
For your next cake, it would only cost you $13.75 or $3.20 if you skip the fondant!! You can't buy a cake for that cheap!
5. I purchased a pack of 10 sunglasses in an assortment of colors for $2.00 at WalMart to give to the other kids as favors. I got the sunglasses idea from my friend, Heather, who did the same thing for her son's first birthday. Half of pack of sunglasses were shaped as stars and the other half were hearts. |
| Photo by Corey Willoughby |
7. Oh, yea! Don't forget the matching plates, napkins and plastic ware! I also had matching buckets to keep the ice water, as seen in the very first picture.
Well, that's all I have for ya! Stars are so much fun, aren't they? I hope you enjoyed our star themed party!
Party on,
Eva :)
Linking up with:
Monday, August 22, 2011

Thursday, August 18, 2011
Thrifty Thursday • Wire Hanger Star
I was searching the internet lately for some ideas for party decorations. Surprisingly, Google was not my friend in finding star decorations. We are having a small "Stella" party for her birthday, which means we are having a "star" party. Most of the star themed party ideas I've come across are for rock star parties or movie star parties. Not really what I am looking for.
We have a lot of extra wire hangers, and of course I have a whole bin full of gift bags and tissue paper from all the baby showers for Stella last year. Remember, I keep things I think I will reuse! So...I came up with the idea to make hanging star decorations out of the wire hangers and tissue paper.
What you will need to make one star:

one wire hanger
8-10 sheets of tissue paper
about 40 inches of craft wire
hot glue
scissors
fishing wire or ribbon

5. Start rounding out the two ends of the wire hanger.
6. You will work the two pointed ends of the hanger to point inwards, making the ends of the wire hanger now the two side indentations of the star.
7. Work with the wire to make the five points of the star as sharp as you can, so that it looks more like a star than a flower. I guess, you could always leave it as a flower, too. Just round out the top point of the star, so that it is like a petal.
I was inspired to use tissue paper to dress up my wire stars from this awesome blog post, where you can learn how to make the tissue paper pom-poms.
To get the same look for your star as mine, you will need the following sizes of tissue paper rectangles to make your pom-poms:
Star center (fuschia): cut out 8 rectangles for each pom-pom flower (5" x 3.5")
Star legs and points (light pink & hot pink): cut out 8 rectangles for each pom-pom flower (3.5" x 2.5")
To utilize the most out of your tissue paper, I folded my tissue paper sheet in half 5 times to get the 5" x 3.5" rectangles and 6 times to get the 3.5" x 2.5" rectangles. Make sure to cut open the folds, so that you have individual loose rectangles.
 *NOTE: You want the pom-poms for the points and legs of the star to be smaller in size, so that you can tell it is a star and not a flower. I made the center flowers larger to add some fullness to the star.
3-4. Wrap your craft wire around the center (you only need about 1 1/2" of craft wire per pom-pom, since these will turn out to be fairly small). (I snipped the wire off of the bead bouquets that I use for the center of my Snappees that I found in the bridal section at Hobby Lobby)


Linking up with...
We have a lot of extra wire hangers, and of course I have a whole bin full of gift bags and tissue paper from all the baby showers for Stella last year. Remember, I keep things I think I will reuse! So...I came up with the idea to make hanging star decorations out of the wire hangers and tissue paper.
 |
| Hanging on Stella's closet door (it matches her room for after the party) |
 |
| I'll hang the stars from the ceiling for the party. |
What you will need to make one star:

one wire hanger
8-10 sheets of tissue paper
about 40 inches of craft wire
hot glue
scissors
fishing wire or ribbon
First, let's make the wire hanger star:
1. Start out with a wire hanger.
2-3. Use your thumb and fore finger to straighten the top bumps to form the top of the star, so that it looks like the picture in #3.
4. Find the center point of the bottom of the wire hanger, and bend it inwards as shown in the picture below. This will make the bottom indentation of the star.

5. Start rounding out the two ends of the wire hanger.
6. You will work the two pointed ends of the hanger to point inwards, making the ends of the wire hanger now the two side indentations of the star.
7. Work with the wire to make the five points of the star as sharp as you can, so that it looks more like a star than a flower. I guess, you could always leave it as a flower, too. Just round out the top point of the star, so that it is like a petal.
Now your stars are ready to be dressed up!
I was inspired to use tissue paper to dress up my wire stars from this awesome blog post, where you can learn how to make the tissue paper pom-poms.
To get the same look for your star as mine, you will need the following sizes of tissue paper rectangles to make your pom-poms:
Star center (fuschia): cut out 8 rectangles for each pom-pom flower (5" x 3.5")
Star legs and points (light pink & hot pink): cut out 8 rectangles for each pom-pom flower (3.5" x 2.5")
To utilize the most out of your tissue paper, I folded my tissue paper sheet in half 5 times to get the 5" x 3.5" rectangles and 6 times to get the 3.5" x 2.5" rectangles. Make sure to cut open the folds, so that you have individual loose rectangles.
Now, for embellishing the wire hanger star:
1. Stack your tissue paper rectangles for your pom pom.
2. Fold them accordian style about 5 times.3-4. Wrap your craft wire around the center (you only need about 1 1/2" of craft wire per pom-pom, since these will turn out to be fairly small). (I snipped the wire off of the bead bouquets that I use for the center of my Snappees that I found in the bridal section at Hobby Lobby)

5. Round each end with a pair of scissors. This will make your pom-poms look more like a flower.
6. Fan out the accordian fold as shown in picture #6.
7-8. Start separating the tissue paper layers from each other, fluffing it up to look like a flower (TIP: be very gently when separating the tissue paper, so that you don't tear it apart)!

9. Hot glue your tissue paper pom-poms onto your wire star, by placing the dab of glue on the center of the pom-pom where the wire is wrapped around.
10. Turn the star over, and wrap the tissue on the back side around the wire, pressing the tissue together to glue the whole pom-pom in place.
11. Glue the bigger pom-poms on the 5 inverted points of the star first. Then glue the rest of the smaller pom-poms on.
12. Bend the hook of the hanger to make more of a circle for a nicer look.
13. Attach fishing wire to hang from the ceiling or some matching ribbon to hang it on the wall, and you're done!
I'd love to see your creations if you make one! Feel free to post a link to a picture in the comment section if you do!
I think these would be cute to make around Christmas and New Year's with festive colors or red, white and blue for the 4th of July. Hey! Labor Day is coming soon!!
Thanks for joining us!
Eva
Subscribe to:
Posts (Atom)